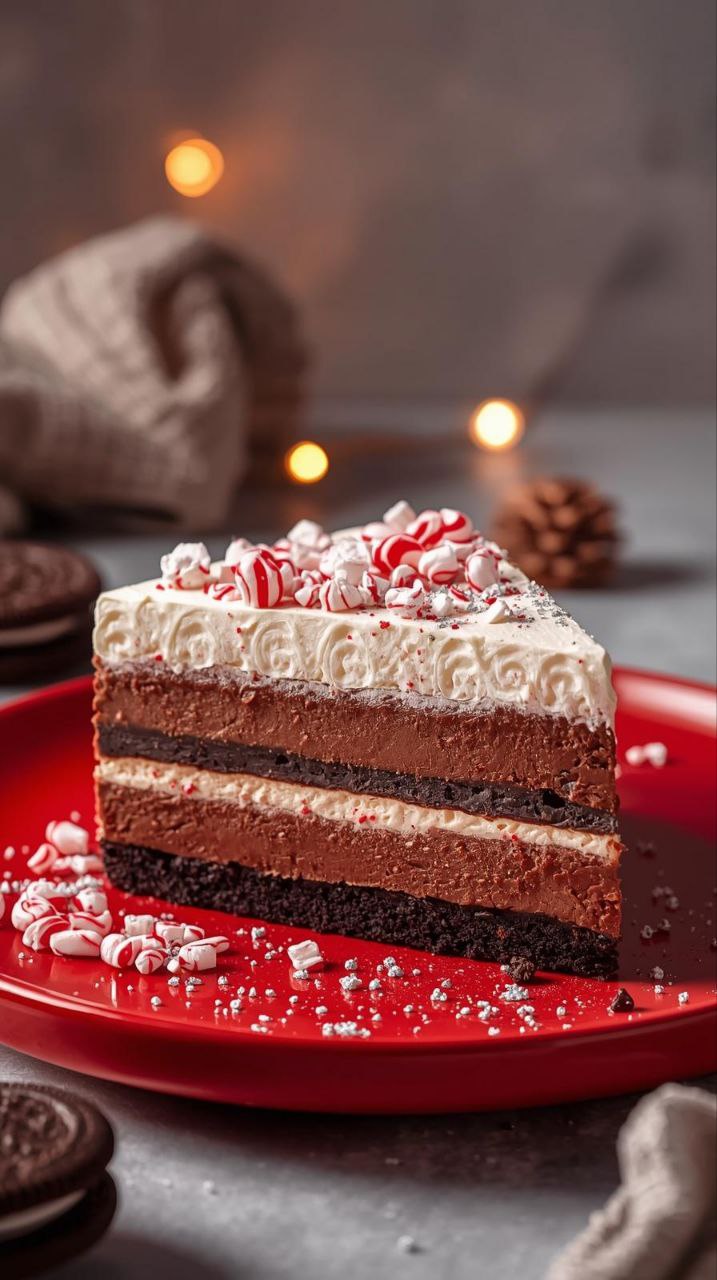
No Bake Christmas Oreo Lasagna: 9 Effortless Fixes for Busy, Oven-Heavy Holiday Weeks
No Bake Christmas Oreo Lasagna has settled into my rotation in late November and December, usually appearing when the week ends and there is a quiet afternoon to prepare something ahead of time. It sits naturally among other easy evening meals because it does not require turning on the oven and can rest in the fridge while the rest of the household continues through its day.
It fits into the rhythm of simple home cooking. Layers assemble quickly, and there is a sense of completeness in its appearance. The dish is cool, creamy, and sweet without being fussy. I notice that it often appears when I want something seasonal, yet straightforward—something that blends predictability with a touch of festivity.
There is no rush with this dish. Once it is layered, it remains stable, and I can step away without checking repeatedly. It fits into the quieter part of the day, when attention is elsewhere, yet it continues to perform as expected when it is finally served.
Why It Stays in Rotation
I continue to make No Bake Christmas Oreo Lasagna because it is reliable. Timing is predictable: assembly takes a short, consistent period, and chilling produces the same set of textures each time. The layers hold together without collapsing, and the cream does not weep excessively if left overnight.
Results are consistent across different Oreo types and cream variations, which reduces decision-making. I rarely need to think about substituting one element for another.
The dish is also forgiving. Slight differences in chocolate or cookie density do not dramatically change the final experience. This makes it a dependable family dinner option for an easy evening meal during the holiday season or when I simply want a quiet, seasonal dessert.
I also appreciate that it requires little active attention. Once assembled, the dish can wait while other cooking continues. The reliability of this resting period makes it an asset in routine meal planning.
Ingredient Behaviour Notes
- Oreo cookies – Provide both structure and sweetness. Crushed finely, they form a stable base; slightly larger pieces add texture without compromising the layer’s integrity. Seasonal varieties, such as chocolate mint, influence taste but not structural behaviour.
- Butter – Binds the crushed Oreos in the base. Amounts need balance: too little, the base is crumbly; too much, it softens excessively in the fridge. I have adjusted over time to a midpoint that holds firmly yet slices cleanly.
- Cream cheese – Brings density and a subtle tang. Room temperature integration prevents lumps and keeps the middle layer smooth. I now rarely add extra sugar beyond what is in the cream topping; the dessert balances naturally.
- Icing sugar – Stabilises the cream layer. I pay more attention to sifting to prevent grit than the exact weight. Small variations do not noticeably change the texture.
- Vanilla extract – Highlights creaminess without overwhelming other flavours. I consider it optional now, as some batches taste balanced without it.
- Chocolate – Melted chocolate layers set a slightly firmer texture against the cream. I have learned that tempered cooling produces cleaner slicing. I am flexible with type—milk, dark, or white chocolate—depending on what is on hand.
- Whipped topping / cream – Final layer softens the dessert visually and texturally. I usually monitor consistency; overly loose cream can migrate between layers, affecting visual neatness but not taste.
Cooking Behaviour Log
The process is quiet and measured. I start with the Oreo base, observing how finely crushed cookies interact with melted butter. There is a gentle resistance as the mixture presses into the dish; it does not require force but needs even distribution.
The cream layer spreads smoothly over the cooled base. I notice the texture is soft yet holds shape. Air pockets are minimal if the cream is fully softened. Temperature matters here: cold cream tends to pull unevenly, while warmer cream integrates evenly without separating.
Chocolate is melted gently. I allow it to cool slightly before layering to avoid sinking through the cream. The visual cue is subtle: a sheen that dulls slightly indicates readiness. Pouring slowly preserves separation between layers.
The top layer—whipped cream or topping—is applied carefully. I note how it spreads without dragging the underlying chocolate. Light pressure is sufficient; overworking it produces minor ridges but does not affect overall structure.
Once fully assembled, I notice the dish responds quietly to chilling. The fridge temperature affects firmness: slightly warmer settings result in a softer cut, while colder temperatures help clean slices but require a longer wait before serving. I have observed that overnight resting produces the most stable layers.
There are subtle sounds while assembling. The crumb base compresses with a soft, barely audible press. Cream spreads without friction, and chocolate sets with a faint sheen, giving a visual cue that it is firming. The whipped topping layer is almost silent, settling into smooth peaks if handled gently.
Layer height is consistent. I do not weigh each layer but rely on observation: the base is firm and level, the cream layer sits evenly, and the chocolate and topping maintain a slight dome. As the dessert chills, minor settling occurs, particularly in the cream layer, but it does not disturb the overall appearance.
I note how temperature transitions affect texture. Slicing straight from the fridge produces clean lines but a firmer mouthfeel. Allowing a few minutes at room temperature softens the cream slightly without causing collapse.
Small Corrections Learned Over Time
- Base compression – I used to press too lightly, resulting in a crumbly edge. Now I ensure even but gentle pressure across the dish.
- Chocolate cooling – Pouring melted chocolate while too hot sometimes created streaks through the cream. Slight cooling before layering prevents this.
- Chill timing – I found that underestimating chilling leads to uneven slicing. Overnight or several hours is consistently sufficient.
- Cream distribution – Overworking whipped cream can produce air pockets that shrink slightly during refrigeration. Gentle spreading avoids this.
These corrections are minor but have accumulated from repeated preparation. They do not alter taste, only texture, appearance, and ease of serving.
Acceptable Variations
- Seasonal Oreos – Mint or festive cream flavours adjust the dish’s profile without affecting stability. I rotate varieties depending on availability and taste preference.
- Chocolate type – Milk, dark, or white chocolate can be used. Each type produces a subtle difference in firmness but does not compromise layering.
- Cream layer – I occasionally swap whipped topping for lightly whipped cream if energy is low or for convenience. Texture is slightly softer but reliable.
- Dish size – I have scaled the recipe for smaller or larger gatherings, adjusting layer depth slightly, without changing proportions.
Variations remain within predictable limits, maintaining the calm, measured nature of the dessert. I do not attempt extreme substitutions; the dish’s stability depends on certain textures being consistent.
Storage and Leftover Notes
No Bake Christmas Oreo Lasagna keeps well in the fridge. I usually cover it lightly with cling film or an airtight lid. It maintains texture and flavour for up to three days. After this, the base begins to soften slightly, and the whipped cream layer may lose some of its peak structure.
Reheating is not necessary. The dessert is intended cold, and I rarely attempt warming. When served after refrigeration, the layers retain separation. Allowing five to ten minutes at room temperature slightly softens the cream, making slicing easier and enhancing mouthfeel.
I have noticed that prolonged storage can result in minor moisture migration from the cream into the cookie base, making it slightly less crisp. The chocolate layer may also develop a thin sheen as it interacts with the fridge environment, but this does not affect taste. Overall, the dish is stable and forgiving if consumed within the first few days.
Common Questions
- Can I make this ahead?
Yes. I assemble it and chill overnight for the best results. - Do the layers hold if cut early?
Partially. I prefer a few hours of chilling; it improves slicing and stability. - Can I use different cream toppings?
Yes. Lightly whipped cream or ready-to-use toppings work. Texture varies slightly but remains reliable. - Will the base get soggy?
Minimal softening occurs after a day, but the base generally holds structure. - Can I change the chocolate type?
Yes. Milk, dark, or white chocolate all behave similarly, though firmness and slicing ease differ slightly. - Does it freeze well?
I do not typically freeze this dessert. Freezing changes texture and cream consistency.
Closing Log Entry
No Bake Christmas Oreo Lasagna remains unchanged in my rotation because it is consistent and predictable. Each element—from the crumbly Oreo base to the creamy middle layer and the chocolate topping—behaves as expected.
It fits quietly into routine because it is both seasonal and practical. Preparation is simple, chilling is forgiving, and presentation is stable. I can assemble it during a calm afternoon, leave it to set, and know that it will be ready when needed without further attention.
The dish continues to be a reliable family dinner dessert or a simple home cooking option for evenings when I want a seasonal, cool treat that does not require the oven. Its structure, taste, and behaviour have earned it a regular place in my kitchen log, and I do not find reason to alter it.
No Bake Christmas Oreo Lasagna – Recipe Card
Prep Time: 20 minutes
Cook Time: 0 minutes (chill time: 4–6 hours, or overnight)
Servings: 8
Ingredients
Base:
- 250 g Oreo cookies (any variety)
- 75 g unsalted butter, melted
Cream layer:
- 300 g cream cheese, softened
- 100 g icing sugar, sifted
- 1 tsp vanilla extract (optional)
Chocolate layer:
- 100 g chocolate, melted (milk, dark, or white)
Top layer:
- 200 ml whipped cream or ready-to-use topping
Method
- Crush Oreos finely. Mix with melted butter and press into the base of a rectangular dish until evenly compact.
- Blend cream cheese with icing sugar and vanilla. Spread evenly over the cooled Oreo base.
- Melt chocolate gently. Allow to cool slightly, then pour over the cream layer, smoothing lightly.
- Spread whipped cream evenly on top. Smooth or create gentle peaks as desired.
- Chill in the fridge for at least four hours, or preferably overnight.
- Slice and serve cold. Allow a few minutes at room temperature if a softer cream texture is preferred.